PIECES
UPS
by Lee S. Brilliant, M.D.
The neophyte programmer sits hunched over his Atari 800, slowly working out the details of his ultimate graphics display. He has been working for the last eight hours to complete his program in time for the computer fair. So he sits glued to the screen, his trusty 410 recorder by his side, oblivious to everything going on around him, including the dark clouds gathering to the west; and as the time passes, the clouds ominously thicken and approach. Then in a flash and one blink of the lights, all eight hours of programming disappear.
Now the scene is a users'-group meeting where the club president has asked for volunteers to work the AtariFest. By the end of the meeting 20 or so people have entered their names into the computer registration. After at least half of the members have left, someone trips on the power cord and the list is gone.
Do any of these situations sound familiar? If they do then you need a UPS or Uninterruptable Power Supply. This month we will look at the last plug on your computer, the power plug, and we will build a UPS and the first portable Atari.

What is a UPS?
A UPS provides power to your computer and
peripherals for as much as several hours, depending on the size of the
unit and the demands of your equipment. Such a device is composed of a
storage battery, an inverter which creates 60 Hz alternating current
from the battery, and a power supply to charge the battery. Generally
speaking there are two types: kick-in and continuous.Look at Figure 1. In the continuous type, 110-volt power is converted to 12 volts in sufficient quantity for the inverter to power the computer all the time. The battery sits in parallel so its energy is consumed only when the main supply fails. Opposed to this is the kick-in type where the battery is kept charged constantly, but the inverter and battery only come online when the AC fails. The major differences are:
1) Cost. The continuous system needs to convert enough AC power to 12 volts DC to run the inverter continuously, and so needs a large, expensive power supply. The kickin type only has to recharge the battery, not replace it.
2) Switch-over time. The continuous types provide instantaneous changeover from AC to battery since the inverter is always running, and the battery is never really disconnected. But the kick-in types need to wait to detect the absence of the AC before the battery and inverter turn on. The minimum is half a cycle which is about eight milliseconds. For practical considerations this is about 10 ms, short enough for the computer's power supply to handle.
Now the bad news. Typical 300-watt units cost at least $350 and are available through computer centers or mail-order supply companies. If you own a $5,000 IBM-AT running a $500 database program, a $350 investment for a UPS is reasonable. But when your UPS purchase could buy a computer, disk drive and monitor, it does not. The good news for XL or XE owners is that you can build your own UPS for under $50, one that will keep your computer running for over an hour in case of a power outage and also free your Atari from power lines.
The Heart of
the UPS
A standard UPS replaces the 110-volt AC power, but
our UPS takes a different approach than those in Figure 1. The new
Atari 8-bit computers run off of single five-volt power supplies, so
all you need is to provide an uninterrupted supply of five-volt power
to your computer, and you are protected from short-term power loss. The
easiest way would be to place a five-volt battery across the power plug
to the computer. As it turns out, four Nickel Cadmium batteries put out
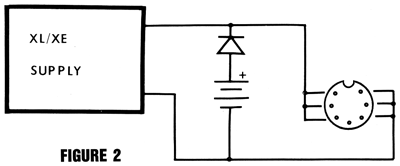
five volts and should suit the bill, as shown in Figure 2.Unfortunately, the details do not work out this easily. The measured output of four freshly charged NiCads is 5.1 volts, while the output of my XL power supply was 4.8 volts under load (about one ampere). The result is that the batteries continuously lose power into the computer even when the power supply is working. You can place a diode in series with the batteries to block reverse flow and drop the battery voltage to about 4.3 volts. This actually works but is only marginally successful because 4.3 volts is below the operational rating of the computer and may result in some berserk operations. The other problem is that the computer's power supply sucks huge amounts of battery power when you unplug it, so battery life is very short. You can, however, easily provide portable operation this way, using only the NiCads without the power supply or diode.
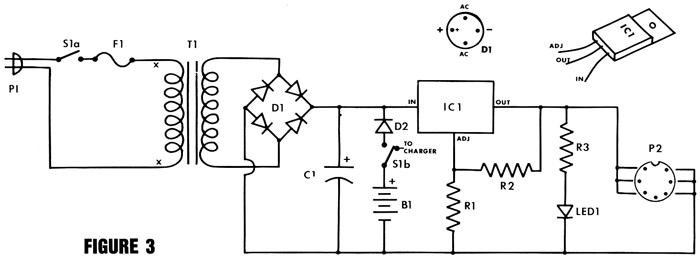
A better approach is to build our own power supply and design it from scratch to use battery back-up, essentially making a version of a continuous-type UPS. The power supply that comes with your Atari could be modified if its innards were accessible, but I don't recommend this approach. There are at least four different supplies that come with the X series computers, and each one is different. Mine is completely filled with epoxy and, so, unmodifiable. The schematic for our homebrew supply is shown in Figure 3.
TI, Dl and C1 generate about 14 volts of DC at one ampere. This is fed to a voltage regulator, IC1, which drops the output to a steady five volts so long as the supply input is over eight volts. So far we have only duplicated the existing Atari power supply, so the 12-volt battery is added to provide power to the regulator even when the 110-volt source dries up. Power from Dl will tend to flow into the battery, which is only about 12 volts. D2 prevents this backflow and consequent overcharging of the battery. With D2 present, there is no current draw from the battery unless the voltage from the Dl stops, then the transfer of power from the battery begins without any delay. If you leave off TI and Dl you have a portable five-volt power supply that runs your computer without a plug-in and could open the way for self-contained Atari robots!
Construction
Construction is not difficult but needs a few
comments for the beginner. The case should be metal since you are
dealing with high voltages and need to provide a heat sink for the
regulator. Use an insulating mounting kit and heat-sink grease to
attach the voltage regulator so there is good thermal contact but no
electrical connection between the regulator and the box. Sand off the
paint from the case under the regulator because if there is not
adequate heat dissipation for the regulator, it will overheat and shut
down, thus defeating the purpose of this project. Don't worry, though,
regulators of this type are virtually immune to damage due to
overheating or overloading including short circuits. The metal box will
get a little warm after running a while and this is normal.A standard 7805 (fixed at five volts) regulator is not quite powerful enough, so I used a LM317T adjustable regulator because 1) it was laying around my shop, and 2) it is rated at 1.5 amps. The values of R1 and R2 are selected to produce exactly five volts from my 317T. You should use a voltmeter to check the output from your supply before plugging into your computer. If you put in more than 5.2 volts, you could turn your Atari into a paperweight. If you need to adjust the output of the regulator, change the value of R1-higher to increase voltage, lower to decrease it. Connections to the seven-pin plug are viewed from the plug's pin side, not the cable end.
Any battery can be used so long as it is between nine and 12 volts. You could use ten NiCads, two lantern batteries, an automobile or motorcycle battery or even eight "D"-size alkalines. The type and size of battery is determined by what you want to do and how long you want to run on battery power. Alkaline batteries should run only 30 minutes or so, but the batteries have a long shelf life and need replacement only after use or after three years.
NiCads are readily available in several sizes: both "C" and "D" sizes have a 1.2-amp-hour rating and are readily available. However, they lose power just sitting around, about 10% per month, and so need frequent recharging. Some "D" varieties have four-amp-hour ratings and so will last three times longer. Automotive batteries have massive power ratings but are quite large and can leak acid.
The best overall types are sealed lead-acid batteries or gelled electrolyte batteries (gel-cells). These types are available in six- and 12-volt sizes in ratings of one to ten amphours. I used a 2.2-amp-hour battery which came with my videotape recorder, but Sears sells such batteries as do most electronics houses. Like NiCads, gel-cells need recharging every so often.
If you notice, nowhere do I provide circuitry for a battery charger. I assume that you will provide your own charger, depending on the batteries used. Dry cells are not rechargeable, NiCads need to be charged separately in their own charger, gel-cells use a different type of charger, while lead-acid types can use a standard automotive unit. So whatever battery you use, get the proper charger to go with it. Slb can be wired so the battery connects to its recharger while the power supply is switched off.

Connections
on the Board
The 1050 disk drives, and 400/800 computers, do not
use five-volt DC inputs. Instead, they need nine volts AC, which is
difficult to produce from a battery. While it is possible to generate
nine volts AC from 12 volts DC, it requires you to build your own
transformer and inverter, and I feel this is beyond the expertise of
the average experimenter. Since most power outages are of short
duration, having one to two hours of power to your computer should
handle the problem without needing to run the disk drive. For portable
operation you can buy just an inverter without the UPS function. The
most commonly sold inverters are Tripp-Lite inverters made by the Tripp
Co. in Chicago, 111. A 200-watt model PV 200 costs about $79, and is
available from Sears and Jameco. Also, some electronic houses can get
them for you.But if you really need to have portable power to a disk drive or want to have the option of saving data to disk before your batteries go dead then never fear; there are simple ways. You can put about 18 volts DC into the power plug (polarity is critical), and the disk drive will run. I don't recommend this method because it puts additional load on the five-volt regulator and can cause thermal shutdown over long periods on battery. This also means you need a separate 18-volt battery for the disk drive besides the 12-volt one for the computer.
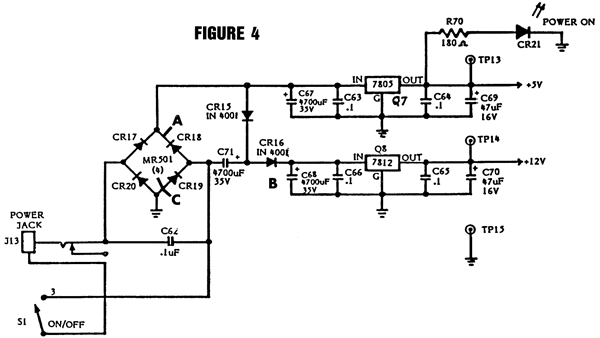
Another approach is easy to do but requires you to open the case of your 1050 drive after it is out of warranty (sorry 810 owners, I don't have the info to know if this works on your drives). First remove all cables and disks from the drive. Place it on its top, and remove the four screws in the deep wells. Now turn it right-side-up, and catch the screws as they fall out. Remove the top cover by lifting it up at the rear then pulling toward the rear. Now refer to Figure 4. This is a drawing of the rear portion of the circuit board as viewed from the top and also a schematic of the diskdrive power supply. You need not make any modifications or remove the board. Instead use three mini test clips with two-foot lengths of 22-gauge or larger wire to attach to CR18, CR16, and CR19 (A, B, and C respectively) as shown on the diagrams.
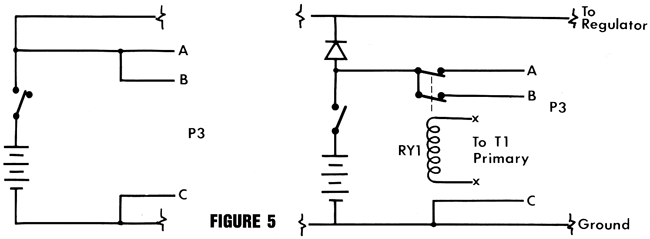
The drive has two power supplies, the first one being a five-volt supply almost identical to the one we built. Number 2 is a voltage doubler which sends about 18 volts to the 12-volt regulator. The connection to CR18 is at the input to the five-volt regulator, CR16 at the 12-volt regulator and CR19 is ground. For this reason, applying 18 volts to the power-input plug will provide about 16 volts to point A and 14 volts to point B, enough to run the drive. Normal input to these points are 10 and 18, respectively, so the excess voltage at A can cause excessive heat on the fivevolt regulator. Bring the wires out through a ventilation slot and close up the case. Now you can connect the three wires to the battery, using P3, as shown in Figure 5.
You can use the first circuit for full-time portable operation or the second, which is a modification of Figure 3, for UPS backup operation. Be careful not to apply the normal nine volts AC power and the battery power at the same time. No damage would occur for short durations, but running for long periods could hurt the drive power supply and/or the battery. Using the same battery to run both the computer and the disk drive consumes about 2.5 amps while the drive is running and about 1.75 when it is idle. With my 2.2-amp-hour battery, I can now run about one hour and format and write about ten full disks. That should be plenty of time to get offline in a power outage.
Using Figure 5b, power transition to battery is instantaneous for the computer but merely fast for the disk drive. As long as there is AC power, RY1 stays pulled in and the disk drive works normally. When the AC drops out, the relay switches in the battery. The on/off switch in the drive won't turn off the drive on battery but does disconnect the ninevolt supply. Disk speed will probably be off, and you might want to check it. Mine runs between one and three RPM too slow, but this still is good enough to work.
Be sure to use write verify! Some programs and DOS versions do not verify writes and so if your speed is off, you may get bad writes and not know it until it is too late!
Additional
Notes
The 800 has the identical power supply to the disk
drive except it has an additional -5 volt supply. This requirement
cannot be met with one battery. You would either need to use two sets
of batteries or resort to using AC. For this you can either use a power
inverter or purchase a special product to do the job. Part #DCONV2 from
All Electronics is a +/- 5V converter and would do the job of producing
the five volts from the single battery. But this would have to be
installed in the power-supply board and would be a difficult approach;
I don't recommend it unless you know what you are doing.Even though you can run your computer and your disk drive on batteries, unless you can see what you are doing, you are dead in the water. I am not aware of any 12-volt composite monitors, but you can buy small portable televisions which run on batteries, most of which will run directly off 12 volts. So I leave it to your imagination to solve this problem. So now you can build your own version of the portable computer that Atari never made by using the basic circuitry in Figure 3. Make the three-amp upgrade using the components listed in the parts list, and with the additional power available you can connect the computer, disk drive and TV to our UPS, connecting to the junction of Dl and D2. A 130 XE, 1050 drive, a micro TV and this power supply can fit into a large attaché or small suitcase. Your outfit can now run full time off either one single plug-in supply, gelcell battery, or substitute a cigarette lighter plug for the battery and run off car power!
So if you find a need to have inexpensive protection against blackouts and brownouts or you want to have portable Atari power, then this project is for you. No more will you worry about people tripping on cords or lightning-induced power flickers.


PARTS LIST
| B1 |
12-volt battery. See text: 10 "C" 1.2-amp-hour NiCads (RS 23-124) with charger (23-132) or 10 "D" 4-amp-hour NiCads (RS 23-140) witn charger (23-138) or 8 "D" alkaline cells (RS 23-550) or 2 lantern batteries (RS 23-016) or 1 12-volt lantern battery (DSE S-3242) or 1 12-volt 1.2-amp-hour gel-cell (DSE S-3315) or 1 12-volt 3-amp-hour gel-cell (DSE S-3320) Use charger (DSE M-9521) |
| C1 | 2200 of capacitor (RS 272-1020) |
| D1 | 1.5-amp bridge rectifier RS 276-1151) |
| D2 | 3-amp blocking diode (RS 276-1141) |
| Fl | 1-amp fuse (RS 270-1273) holder (RS 270-739) |
| IC1 | LM317T adjustable regulator (RS 276-1778) mounting kit (RS 276-1373) heat-sink grease (RS 276-1372) |
| LED1 | Red LED (RS 276-041) |
| P1 | Power cord (RS 278-1255) |
| P2 | 7-pin DIN plug, not at Radio
Shack but available at many electronics stores. (ALL #DIN-7M) |
| R1 | 560-ohm, 1/2 watt resistor (RS 271-020) |
| R2 | 180-ohm, 1/2 watt resistor (RS 271-014) |
| R3 | 330-ohm, 1/2 watt resistor (RS 271-017) |
| S1 | DPDT switch, 6-amp rating (RS 275-652) |
| T1 | 12-volt, 1.2-amp transformer (RS 273-1352) |
| Misc | Metal cabinet (RS 270-252) Strain reliefs (RS 278-1636) 4 feet of 18-gauge wire for computer power cable or another P1 with plug cut off. Power plug for battery pack (RS 274-1565 and 274-1567) |
For 3-amp modifications, substitute: |
|
| D1 | 4-amp bridge rectifier (RS 276-1146) |
| T1 | 3-amp transformer (RS 273-1511) |
Additional parts for disk-drive power adaptor:
5-pin DIN plug (RS 274-003)
jack (RS 274-005)
RY1 Relay, 110 volt (RS 275-220)
3 2-foot lengths of 20-gauge wire
(RS 278-1293)
3 mini test clips (RS 270-372)
Power inverter: TrippLite PV-200
Jameco PV-200
Sears 28-b-71522
NOTE: this device uses 3.5 to 18 amps and requiresSears 28-b-71522
a large battery such as an automotive battery.
SOURCES
All Electronics (ALL)
P.O. Box 20406
Los Angeles, Ca. 90006
Dick Smith Electronics (DSE)
P.O. Box 8021
Redwood City, Ca. 94063
Jameco Electronics
1355 Shoreway Rd.
Belmont, Ca. 94002
Radio Shack (RS)
Check phone book for local listing.
Sears and Roebuck
Check phone book for local listing.