Serial Transfers: NCs and Macs
Connecting an Amstrad NC Notepad to an Apple Macintosh
By Gavin Taylor
What you need
In order to connect an NC Notepad to a Macintosh computer (with a serial port), you need a null modem serial cable and a terminal program. For Macs without serial ports, I have tested a first generation iMac using a Keyspan USB/Serial converter and everything worked perfectly.
I have never seen a Mac to PC null modem cable on sale in southern Europe, but they may well exist in more digitalized parts of the world. One way to achieve this set up is to use a normal Mac serial modem cable combined with a PC null modem cable. I suggest taking both your modem cable (if you already have one) and the Amstrad with you to the shop so that you can make sure all the sizes and plug "genders" are correct. Alternatively you can make your own cable by following the instructions below.
I have successfully used various terminal programs. First, MacComCenter, which I got with my US Robotics modem, then the shareware program Z-Term. More recently I have used Appleworks (formerly Claris Works) in versions 2 and 5. Since Appleworks is both excellent and nowadays bundled with virtually every Macintosh, I describe a connection using Appleworks 5.
Making a cable
You need a fine point soldering iron, the relevant plugs, some cable, a test meter, and a steady hand, because soldering the 8 pin Mac minidin is very fiddly. I bought a PC null modem cable and then simply cut off the PC end, savage perhaps, but it saves you soldering the Pad-end plug, and you know for sure that you have the right type of cable (it does mean that you have to use the test meter to identify which wire hanging out the cut end is connected to which pin on the Pad-end).
When you use the pin numbering diagrams, note that the view is looking into the cable plug from the front (as if you were about to plug it into your face). This is important because when you are soldering (in particular the Mac minidin) you are looking at the plugs the wrong way round. Also note that sometimes two wires from the Pad-end have to be joined to just one pin on the Mac-end plug.
When I had 'finished' I found that my soldered wires kept shorting, either with each other or with the external plug shield (I discovered this with the test meter). The solution was to feed very fine insulation between the wires and then around the whole lot before sliding on the plug cover. I used sellotape for reduced bulk.
| NC Serial Plug | Mac Serial Plug | |
| front view |
|
|
| Nominal colour | From pin number | To pin number |
| Red | 1 | |
| Orange | 2 | 5 |
| Green | 3 | 3 |
| Yellow | 4 | 1 |
| Black | 5 | 4 |
| Violet | 6 | 2 |
| Blue | 7 | 1 |
| Violet | 8 | 2 |
| Brown | 9 |
Preparing the terminals
NOTE: All my programs are in Italian (including my Notepad!) so I have to guess the equivalents in English. Please let me know of any errors so that they can be corrected.
Phase one - preparing the Mac terminal.
- Open Appleworks and choose to create a new Communications document.
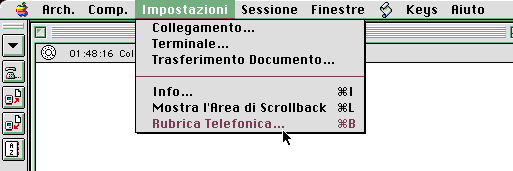
- Go the the settings menu (all the illustrations are in Italian, but are essentially the same).

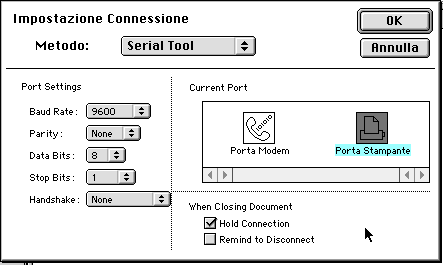
- Choose the first item in the menu, probably 'Connection', and set up as shown below. Ensure that the 'Current Port' setting is correct for the port where your cable is actually inserted.

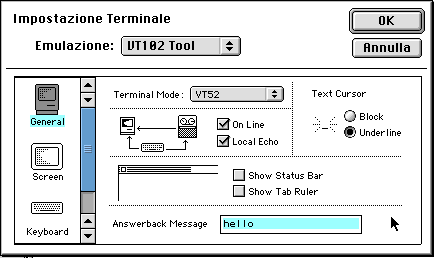
- Choose the second item in the menu, probably 'Terminal', and set up as shown below.

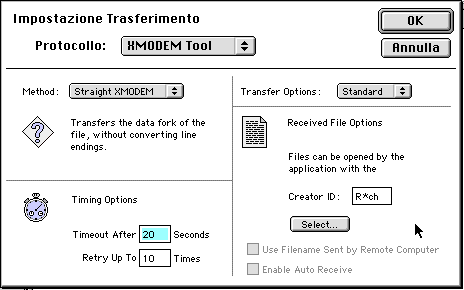
- Choose the third item in the menu, probably 'Document transfer', and set up as shown below. Note, however, that the last parameter, 'Received File Options' has been set for the (incredibly good) freeware text editor BBEdit Lite. You can leave this parameter as 'txt' (plain text) or, if you prefer, press the select button and choose any text editor installed on your computer.

- Now go to the File menu and save your document. Later you will be able to use this document to quickly establish a link with your Notepad.
Phase two - preparing the Notepad terminal.
- Switch on the Notepad and Press Function/S to open the terminal program.
- Press Menu and choose 'Configure Port'. Set the following:
Parameter Setting Baud rate 9600 Parity NONE XON / XOFF YES Page pause NO ECHO YES Add linefeed NO Stop bit 8/1
- Now press STOP to open the terminal program.
- Press Menu and choose Terminal Settings. Set the following:
Parameter Setting Protocol XModem Use CRC YES Block retries 9 Timeout limit 9 Ask overwrite YES Convert to ASCII YES - Press STOP to return to the terminal program.
Making the Connection
The machines should now be ready to communicate. Note that the settings given above are simply one combination that works. There are numerous other possibilities, but bear in mind that changes you make on one side of the link normally have to be matched on the other side.
Assuming the cable is connected (to be done with the Notepad OFF), and the two terminal programs are set up and running, try typing a few letters on one of the keyboards. The letters you type should appear on both screens. Try typing on the other keyboard and the same thing should happen.
If, when you type, text appears on the opposite computer but not the one of origin this just means that the 'local echo' is not set to ON (not really important).
If nothing happens, then go to the Mac and check the 'Session' menu to see if 'Open Connection' is available. If it is, then choose it. Sometimes it also helps to shut down the Notepad terminal and then reopen it. If there is still nothing then the cable could be the problem, or a basic terminal setting is wrong (for example, the Mac terminal is not set for the correct serial port).
When the computers are communicating you can start transferring files as follows:
To send from the Notepad to the Mac
- On the Notepad press Menu and select "Send File".
- Move the cursor onto the file (choose a text file for your first test) you want to transfer (don't push return yet).
- Go to the Mac terminal and look under the Session menu and find 'Receive File' (don't choose it yet).
- Having prepared the send, and found the receive commands, you are now ready to transfer. Activate both send and receive commands. They can be activated in any order, but within a few seconds of each other.
- The Mac should now ask you to name the new file. Give it a name and press Save.
- Open the document to check that all is OK.
To send from the Mac to the Notepad
- Go to the Mac terminal and look under the Session menu and choose 'Send File'. Browse until you see the file you want to transfer and select it (don't press 'Send' or 'Return' yet). Note that you should choose a small plain text file for your first test, and you must have enough space for it on the Notepad.
- On the Notepad press Menu and select "Receive File".
- Choose 'New file' (the default) and give your incoming file a name (don't push return yet).
- Having prepared the send, and the receive commands, you are now ready to transfer. Activate both send and receive commands. They can be activated in any order, but within a few seconds of each other.
- The Notepad should now return to terminal mode (blank). Press Menu and choose Exit to leave the terminal.
- Find the new file and open it.
Final notes
Don't be surprised if it doesn't work first time. Keep trying, checking one variable at a time.
When the system is operational, make a backup copy of your Appleworks document, and a copy of your final Notepad settings (you could write these into the comments of your Appleworks document) just in case you have to initialize your Notepad.
You can contact the author of the present section either to suggest improvements or ask advice.
Gavin Taylor gtaylor@libero.it (26/6/2000)
| © 1997 – 2021 Tim Surtell | Tim's Amstrad NC Users Site |
| Home | Features | Data Sheets | Questions | BBC BASIC | Software |

